> ## Documentation Index
> Fetch the complete documentation index at: https://mintlify-update-mintlify-cc-domain.mintlify.site/llms.txt
> Use this file to discover all available pages before exploring further.
# Model Context Protocol (MCP)
> Connect your documentation and API endpoints to AI tools like Claude and Cursor with a hosted Model Context Protocol (MCP) server.
export const PreviewButton = ({children, href}) => {
return
{children}
;
};
## About MCP servers
The Model Context Protocol (MCP) is an open protocol that creates standardized connections between AI applications and external services, like documentation. Mintlify generates an MCP server from your documentation, preparing your content for the broader AI ecosystem. Any MCP client like Claude, Cursor, Goose, or ChatGPT can connect to your documentation.
Your MCP server exposes tools for AI applications to search your documentation and retrieve full page content. Your users must connect your MCP server to their tools.
Looking to let agents edit your content instead of read it? See the [Mintlify MCP server](/ai/mintlify-mcp) for an authenticated MCP server that exposes branching, page editing, navigation, and `docs.json` tools to trusted agents.
### How MCP servers work
When an AI application connects to your documentation MCP server, it can search your documentation and retrieve full page content directly in response to a user's prompt. This avoids relying on information from training data or generic web searches. Your MCP server provides access to all indexed content on your documentation site.
* AI applications can proactively search your documentation while generating a response even if not explicitly asked to search your documentation for an answer.
* AI applications determine when to use the available tools based on the context of the conversation and the relevance of your documentation.
* Each tool call happens during the generation process, so the AI application uses up-to-date information from your documentation to generate its response.
Some AI tools like Claude support both MCP and skills. MCP gives access to your documentation content, while skills instruct agents how to use that content effectively. They're complementary and connecting your MCP server gives agents access to both.
### MCP tools
Your MCP server provides two tools that agents can use:
* **Search**: Searches across your documentation to find relevant content, returning snippets with titles and links. Use this to discover information or find pages matching a query.
* **Query docs filesystem**: Reads and navigates your documentation's virtual filesystem using shell-style commands. Use this to retrieve page content, browse the docs structure, or extract specific sections—including batch reads across multiple pages in a single call.
Agents determine when to use each tool based on the context of the conversation. For example, an agent might first search your documentation to find relevant pages, then use the query docs filesystem tool to read the full content of the most relevant results.
### MCP resources
Your MCP server also exposes your [skill.md files](/ai/skillmd) as MCP resources. Agents connected to your MCP server can discover and access your skill files without installing them separately.
`Skill.md` resources appear in the MCP server's resource list and contain the capability descriptions Mintlify generates or that you define in your [custom skill files](/ai/skillmd#custom-skill-files).
### Search parameters
The MCP search tool supports optional parameters that AI applications use to control and refine search results.
* **`version`**: Filter results to a specific documentation version. For example, `'v0.7'`. Only available when your documentation has multiple versions. Only returns content tagged with the specified version or content available across all versions.
* **`language`**: Filter results to a specific language code. For example, `'en'`, `'zh'`, or `'es'`. Only available when your documentation has multiple languages. Only returns content in the specified language or content available across all languages.
AI applications determine when to apply these parameters based on the context of the user's query. For example, if a user asks about a specific API version, the AI application may automatically apply the appropriate filter to provide more relevant results.
### MCP compared to web search
AI tools can search the web, but MCP provides distinct advantages for documentation.
* **Direct source access**: Web search depends on what search engines have indexed, which may be stale or incomplete. MCP searches your current indexed documentation directly.
* **Integrated workflow**: MCP allows the AI to search during response generation rather than performing a separate web search.
* **No search noise**: SEO and ranking algorithms influence web search results. MCP goes straight to your documentation content.
## Access your MCP server
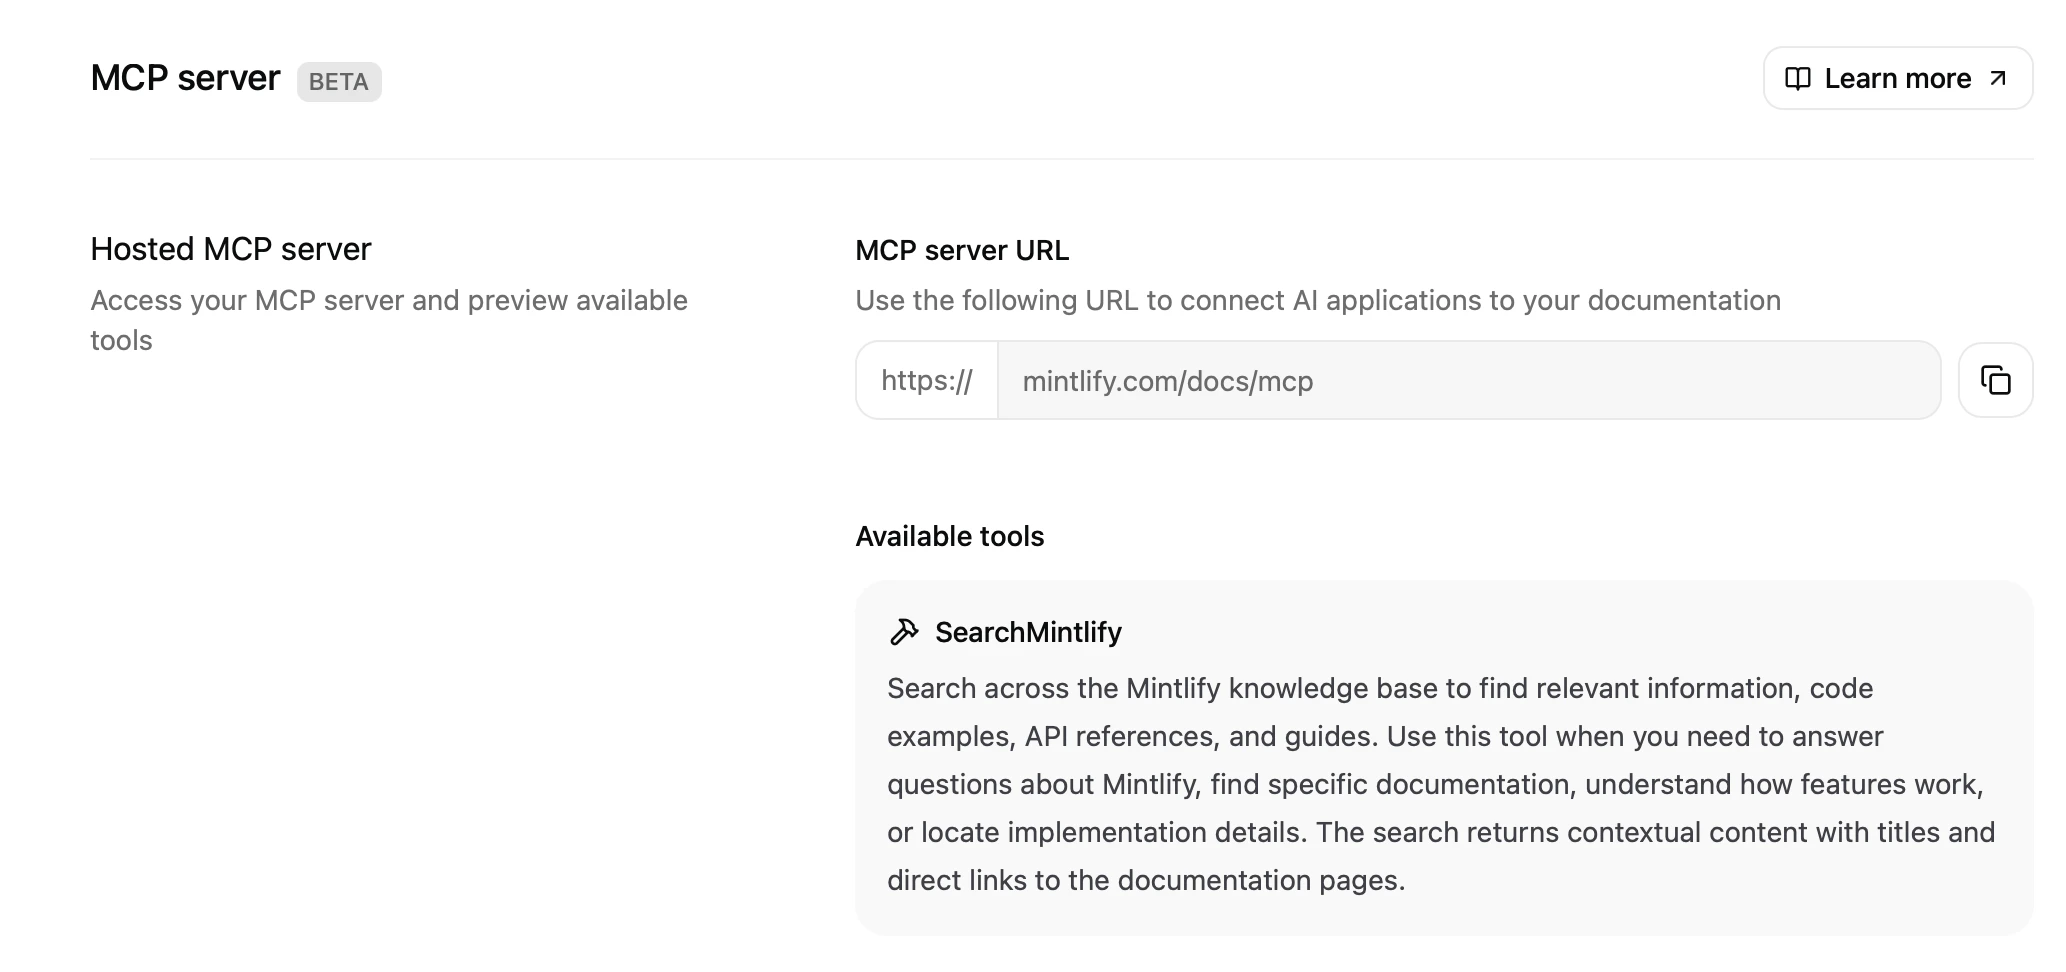
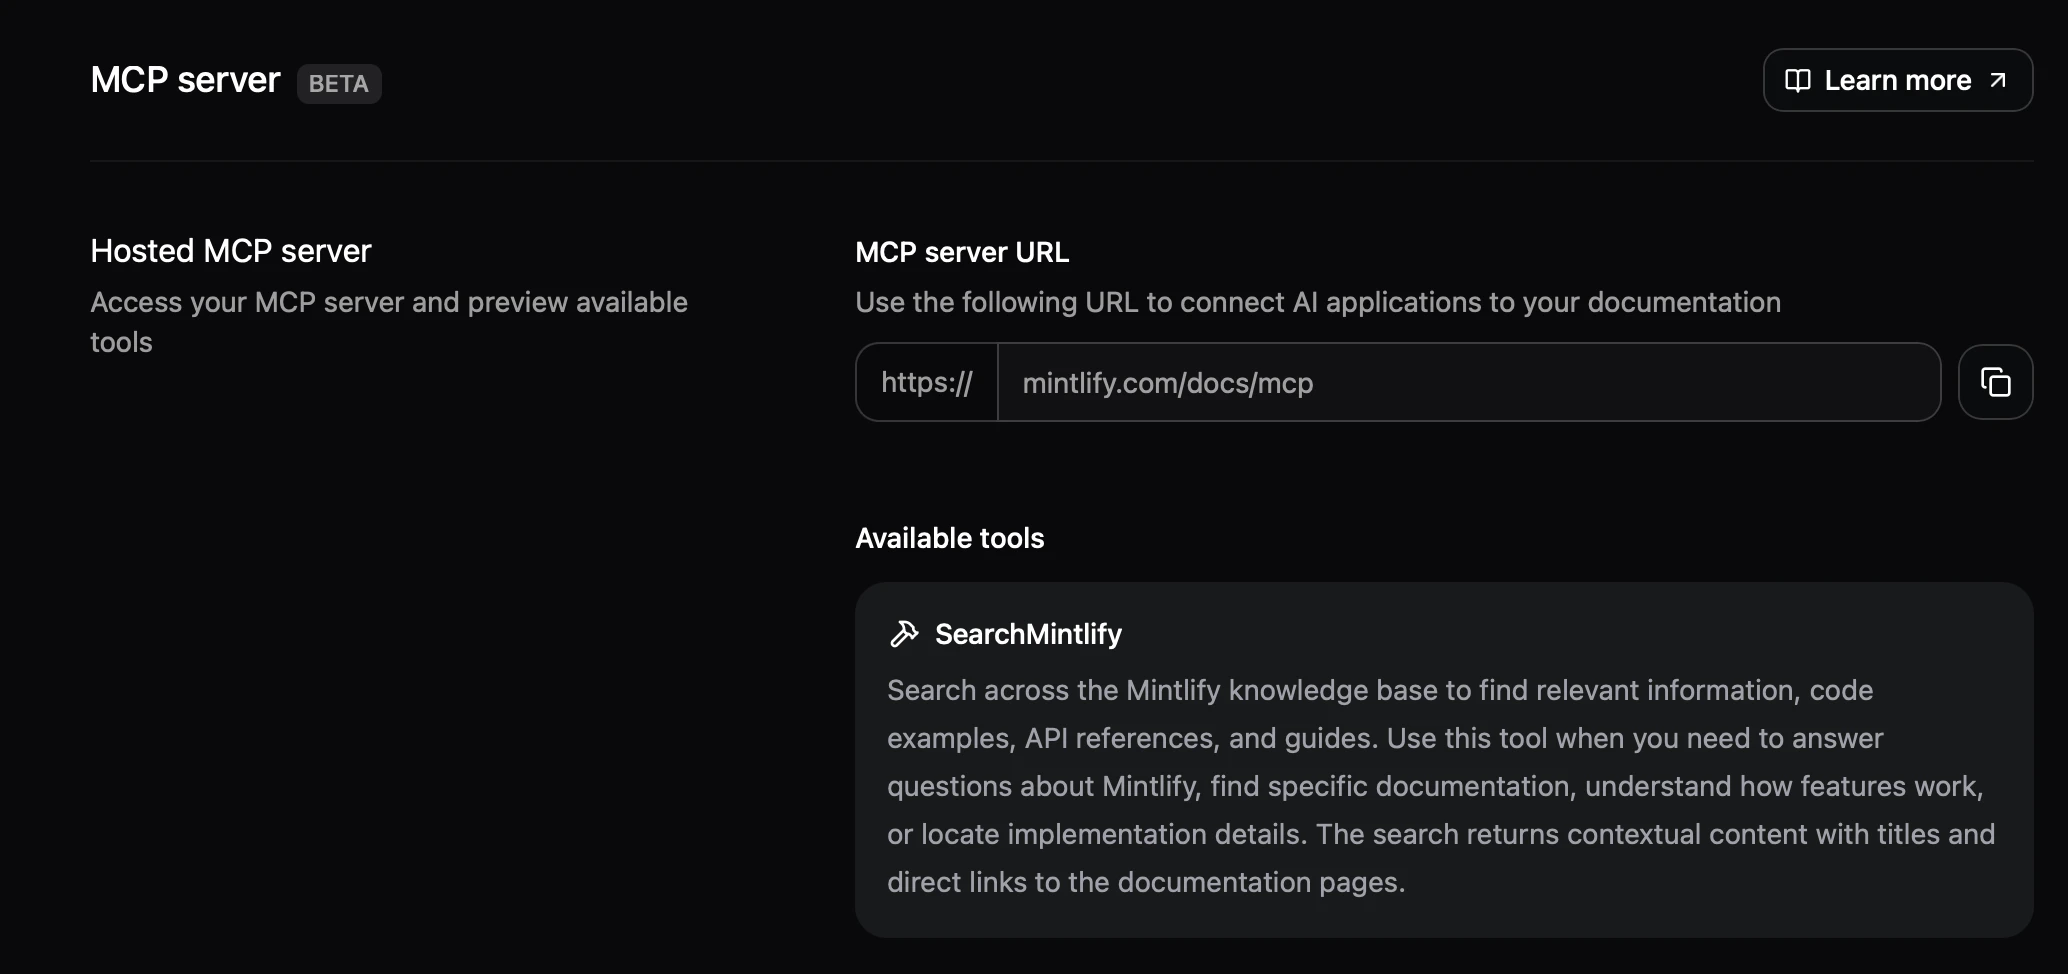
Mintlify generates an MCP server for your documentation and hosts it at the `/mcp` path of your documentation URL. For example, Mintlify's MCP server is available at `https://mintlify.com/docs/mcp`.
* For public documentation, your MCP server is available to anyone. It searches all indexed public pages.
* For documentation with partial authentication, where some pages are public and others require login, you must enable your MCP server before users can access it. Unauthenticated users can search public content. Users who authenticate can search all content they have permission to access based on their [user groups](/deploy/authentication-setup).
* For documentation where all pages require authentication, you must enable your MCP server before it is available to users. Users must authenticate before connecting to your MCP server. Your MCP server searches only the content each user has access to based on their [user groups](/deploy/authentication-setup).
View and copy your MCP server URL on the [MCP server page](https://dashboard.mintlify.com/products/mcp) in your dashboard.
 Hosted MCP servers use the `/mcp` and `/authed/mcp` paths. Other navigation elements cannot use these paths.
### Discovery endpoint
Mintlify hosts a discovery document at `/.well-known/mcp` for agents and tools to locate your MCP server without prior configuration.
`GET /.well-known/mcp` returns a JSON document describing your MCP server:
```json theme={null}
{
"version": "1.0.0",
"transport": "http",
"url": "https://your-docs.com/mcp",
"servers": [
{
"name": "public",
"url": "https://your-docs.com/mcp",
"transport": "http",
"authentication": "none"
},
{
"name": "authenticated",
"url": "https://your-docs.com/authed/mcp",
"transport": "http",
"authentication": "oauth2"
}
]
}
```
| Field | Description |
| -------------------------- | --------------------------------------------------------------------------------------------------------------------------------------------- |
| `version` | The MCP server version. |
| `transport` | The transport protocol. Always `http`. |
| `url` | The default public MCP server URL. |
| `servers` | Available MCP servers. Always includes a `public` entry. When authentication is enabled on your site, also includes an `authenticated` entry. |
| `servers[].name` | Identifier for the server entry. |
| `servers[].authentication` | Authentication method for the server entry. |
### Enable authenticated MCP
If your documentation requires authentication, your MCP server requires users to authenticate before connecting. When a user adds your MCP server URL to their AI tool, they must log in with their existing credentials. After authenticating, a redirect sends them back to their tool. The MCP server only returns content each user has permission to access based on their [user groups](/deploy/authentication-setup).
If your documentation has partial authentication with both public and protected pages, you have two MCP server endpoints:
* `/mcp`: Does not require authentication. Returns only public content. Share this with users who need access to public content.
* `/authed/mcp`: Always requires authentication. Returns content scoped to each user's permissions based on their [user groups](/deploy/authentication-setup). Share this with users who need access to protected content.
The `/authed/mcp` endpoint uses its own OAuth flow at `/authed/mcp/oauth/*`. Redirect domains configured for your MCP server apply to both `/mcp` and `/authed/mcp`.
By default, your MCP server is only available for localhost tools. To allow web-based tools to connect, add the redirect domains for the AI tools. A redirect domain is the hostname that an AI tool uses after a user completes authentication like `claude.ai` or `app.cursor.ai`. Your users' AI tools cannot complete authentication unless their redirect domain is on this list.
1. Navigate to the [MCP server page](https://dashboard.mintlify.com/products/mcp) in your dashboard.
2. Click the **Enable MCP Server** toggle.
Add the redirect domains for the AI tools you want to grant your users access to. Your users' AI tools cannot complete authentication unless their redirect domain is on this list. Common redirect domains include `claude.ai` and `vscode.dev/redirect`.
By default, redirect domains use `https://`. To allow a custom protocol scheme, include the full protocol in the domain entry. For example, a native app callback like `myapp://callback`. Mintlify always blocks dangerous protocols such as `javascript:`, `data:`, and `file:`.
Loopback addresses (`localhost`, `127.0.0.1`) are always trusted and do not need to be added.
### Client credentials
Client credentials let you connect to your authenticated MCP server programmatically without a browser-based login. Use client credentials for server-side integrations, CI/CD pipelines, automated workflows, and any environment where a user cannot complete an interactive OAuth flow.
Client credentials authenticate against the `/authed/mcp` endpoint and return all content from public pages and authenticated pages that aren't restricted to specific groups.
1. Navigate to the [MCP server page](https://dashboard.mintlify.com/products/mcp) in your dashboard.
2. In the **Client Credentials** section, click **Create credential**.
3. Enter a label for the credential to identify its purpose.
4. Copy the **client ID** and **client secret**. The client secret is only shown once. You cannot retrieve it later.
Send a POST request to your MCP server's token endpoint with your client ID and secret. Your token endpoint is at the `/authed/mcp/oauth/token` path of your documentation URL.
```bash cURL theme={null}
curl -X POST https://your-docs.com/authed/mcp/oauth/token \
-H 'Content-Type: application/x-www-form-urlencoded' \
-d 'grant_type=client_credentials&client_id=CLIENT_ID&client_secret=CLIENT_SECRET'
```
```bash cURL (Basic Auth) theme={null}
curl -X POST https://your-docs.com/authed/mcp/oauth/token \
-H 'Content-Type: application/x-www-form-urlencoded' \
-H 'Authorization: Basic BASE64_CLIENT_ID_COLON_SECRET' \
-d 'grant_type=client_credentials'
```
The response includes an access token and a refresh token:
```json theme={null}
{
"access_token": "eyJhbGciOi...",
"token_type": "Bearer",
"expires_in": 1209600,
"refresh_token": "eyJhbGciOi...",
"scope": "mcp:search"
}
```
Access tokens expire after the number of seconds specified in `expires_in`. Use the `refresh_token` to obtain a new access token when the current one expires.
Use the access token as a bearer token when connecting to the `/authed/mcp` endpoint.
```bash cURL theme={null}
curl -X POST https://your-docs.com/authed/mcp \
-H 'Authorization: Bearer ACCESS_TOKEN' \
-H 'Content-Type: application/json' \
-H 'Accept: application/json, text/event-stream' \
-d '{
"jsonrpc": "2.0",
"id": 1,
"method": "initialize",
"params": {
"protocolVersion": "2025-03-26",
"capabilities": {},
"clientInfo": {"name": "my-integration", "version": "1.0.0"}
}
}'
```
```bash Claude Code theme={null}
claude mcp add --transport http \
--header "Authorization: Bearer ACCESS_TOKEN" \
my-docs https://your-docs.com/authed/mcp
```
#### Managing client credentials
You can manage your client credentials from the [MCP server page](https://dashboard.mintlify.com/products/mcp) in your dashboard.
* **Delete a credential** to permanently revoke access. This cannot be undone.
Treat client secrets like passwords. Do not commit them to source control or expose them in client-side code. Use environment variables or a secrets manager to store them.
### Rate limits
To protect availability, Mintlify applies rate limits to MCP servers.
| Scope | Limit | Description |
| :------------------------------------------------------------------ | :----------------------- | :----------------------------------------------------------------------------------------------- |
| Per user (IP address) | 5,000 requests per hour | Limits how frequently a single user can query your MCP server configuration. |
| Search per documentation site (domain) | 10,000 requests per hour | Limits total search tool calls across all users of your MCP server. |
| Query docs filesystem per documentation site (domain) | 10,000 requests per hour | Limits total query docs filesystem tool calls across all users of your MCP server. |
| Authenticated search per documentation site (domain) | 5,000 requests per hour | Limits total authenticated search tool calls across all users of your MCP server. |
| Authenticated query docs filesystem per documentation site (domain) | 5,000 requests per hour | Limits total authenticated query docs filesystem tool calls across all users of your MCP server. |
## Content filtering and indexing
Your MCP server searches content that Mintlify indexes from your documentation repository. File processing and search indexing control what content is available through your MCP server.
For documentation that requires authentication, your MCP server indexes [public pages](/deploy/authentication-setup#make-pages-public) and any pages an authenticated user has permission to access based on their [user groups](/deploy/authentication-setup#restrict-pages-to-specific-user-groups).
For documentation with partial authentication, unauthenticated users can search public pages. Authenticated users can search public pages and any pages they have permission to access based on their user groups.
### File processing with `.mintignore`
If files match [.mintignore](/organize/mintignore) patterns, Mintlify does not process or index them. These files are not available through your MCP server.
### Search indexing with `docs.json`
By default, Mintlify only indexes pages included in your `docs.json` navigation for search through your MCP server.
Mintlify excludes [hidden pages](/organize/hidden-pages) (pages not in your navigation) from the search index unless you choose to index all pages. To include hidden pages in your MCP server's search results, add the `seo.indexing` property to your `docs.json`.
```json theme={null}
"seo": {
"indexing": "all"
}
```
To exclude a specific page from search indexing, add `noindex: true` to its frontmatter.
```mdx theme={null}
---
title: "Hidden page"
description: "This page is not in the navigation and is not available through search."
noindex: true
---
```
## Use your MCP server
Your users must connect your MCP server to their preferred AI tools.
1. Make your MCP server URL publicly available.
2. Users copy your MCP server URL and add it to their tools.
3. Users access your documentation through their tools.
These are some of the ways you can help your users connect to your MCP server:
Add options in the [contextual menu](/ai/contextual-menu) for your users to connect to your MCP server from any page of your documentation.
| Option | Identifier | Description |
| :--------------------------- | :--------- | :---------------------------------------------------------- |
| **Copy MCP server URL** | `mcp` | Copies your MCP server URL to the user's clipboard. |
| **Copy MCP install command** | `add-mcp` | Copies the `npx add-mcp` command to install the MCP server. |
| **Connect to Cursor** | `cursor` | Installs your MCP server in Cursor. |
| **Connect to VS Code** | `vscode` | Installs your MCP server in VS Code. |
Navigate to your [dashboard](https://dashboard.mintlify.com/products/mcp) and find your MCP server URL.
Create a guide for your users that includes your MCP server URL and the steps to connect it to Claude.
1. Navigate to the [Connectors](https://claude.ai/settings/connectors) page in the Claude settings.
2. Click **Add custom connector**.
3. Add your MCP server name and URL.
4. Click **Add**.
5. When using Claude, click the attachments button (the plus icon).
6. Select your MCP server.
See the [Model Context Protocol documentation](https://modelcontextprotocol.io/docs/tutorials/use-remote-mcp-server#connecting-to-a-remote-mcp-server) for more details.
Navigate to your [dashboard](https://dashboard.mintlify.com/products/mcp) and find your MCP server URL.
Create a guide for your users that includes your MCP server URL and the command to connect it to Claude Code.
```bash theme={null}
claude mcp add --transport http
```
See the [Claude Code documentation](https://docs.anthropic.com/en/docs/claude-code/mcp#installing-mcp-servers) for more details.
Navigate to your [dashboard](https://dashboard.mintlify.com/products/mcp) and find your MCP server URL.
Create a guide for your users that includes your MCP server URL and the steps to connect it to Cursor.
1. Use Command + Shift + P (Ctrl + Shift + P on Windows) to open the command palette.
2. Search for "Open MCP settings".
3. Click **Add custom MCP**. This opens the `mcp.json` file.
4. In `mcp.json`, configure your server:
```json theme={null}
{
"mcpServers": {
"": {
"url": ""
}
}
}
```
See the [Cursor documentation](https://docs.cursor.com/en/context/mcp#installing-mcp-servers) for more details.
Navigate to your [dashboard](https://dashboard.mintlify.com/products/mcp) and find your MCP server URL.
Create a guide for your users that includes your MCP server URL and the steps to connect it to VS Code.
1. Create a `.vscode/mcp.json` file.
2. In `mcp.json`, configure your server:
```json theme={null}
{
"servers": {
"": {
"type": "http",
"url": ""
}
}
}
```
See the [VS Code documentation](https://code.visualstudio.com/docs/copilot/chat/mcp-servers) for more details.
### Example: Connect to the Mintlify MCP server
Connect to the Mintlify MCP server to search this documentation site within your preferred AI tool. This gives you more accurate answers about how to use Mintlify in your local environment and demonstrates how you can help your users connect to your MCP server.
At the top of this page, click the contextual menu, then click **Connect to Cursor** or **Connect to VS Code** to connect the Mintlify MCP server to the IDE of your choice.
To use the Mintlify MCP server with Claude:
1. Navigate to the [Connectors](https://claude.ai/settings/connectors) page in the Claude settings.
2. Click **Add custom connector**.
3. Add the Mintlify MCP server:
* Name: `Mintlify`
* URL: `https://mintlify.com/docs/mcp`
4. Click **Add**.
1. When using Claude, click the attachments button (the plus icon).
2. Select the Mintlify MCP server.
3. Ask Claude a question about Mintlify.
See the [Model Context Protocol documentation](https://modelcontextprotocol.io/docs/tutorials/use-remote-mcp-server#connecting-to-a-remote-mcp-server) for more details.
To use the Mintlify MCP server with Claude Code, run the following command:
```bash theme={null}
claude mcp add --transport http Mintlify https://mintlify.com/docs/mcp
```
Test the connection by running:
```bash theme={null}
claude mcp list
```
See the [Claude Code documentation](https://docs.anthropic.com/en/docs/claude-code/mcp#installing-mcp-servers) for more details.
Install in Cursor
To connect the Mintlify MCP server to Cursor, click the **Install in Cursor** button. Or to manually connect the MCP server, follow these steps:
1. Use Command + Shift + P (Ctrl + Shift + P on Windows) to open the command palette.
2. Search for "Open MCP settings".
3. Click **Add custom MCP**. This opens the `mcp.json` file.
In `mcp.json`, add:
```json theme={null}
{
"mcpServers": {
"Mintlify": {
"url": "https://mintlify.com/docs/mcp"
}
}
}
```
In Cursor's chat, ask "What tools do you have available?" Cursor should show the Mintlify MCP server as an available tool.
See [Installing MCP servers](https://docs.cursor.com/en/context/mcp#installing-mcp-servers) in the Cursor documentation for more details.
Install in VS Code
To connect the Mintlify MCP server to VS Code, click the **Install in VS Code** button. Or to manually connect the MCP server, create a `.vscode/mcp.json` file and add:
```json theme={null}
{
"servers": {
"Mintlify": {
"type": "http",
"url": "https://mintlify.com/docs/mcp"
}
}
}
```
See the [VS Code documentation](https://code.visualstudio.com/docs/copilot/chat/mcp-servers) for more details.
### Using multiple MCP servers
Users can connect multiple MCP servers to their AI tools. Connected MCP servers do not consume context until the AI calls a search tool. The AI decides when to search based on query relevance, so it doesn't search every connected server for every question.
When the AI searches, each query returns multiple results that add to the conversation's context. If the AI searches several servers for a single question, this can use up significant context.
Best practices for using multiple MCP servers:
* Connect only the MCP servers relevant to your current work.
* Be specific in your prompts so the AI searches the most relevant server.
* Disconnect servers you're not actively using to reduce potential context usage.
Hosted MCP servers use the `/mcp` and `/authed/mcp` paths. Other navigation elements cannot use these paths.
### Discovery endpoint
Mintlify hosts a discovery document at `/.well-known/mcp` for agents and tools to locate your MCP server without prior configuration.
`GET /.well-known/mcp` returns a JSON document describing your MCP server:
```json theme={null}
{
"version": "1.0.0",
"transport": "http",
"url": "https://your-docs.com/mcp",
"servers": [
{
"name": "public",
"url": "https://your-docs.com/mcp",
"transport": "http",
"authentication": "none"
},
{
"name": "authenticated",
"url": "https://your-docs.com/authed/mcp",
"transport": "http",
"authentication": "oauth2"
}
]
}
```
| Field | Description |
| -------------------------- | --------------------------------------------------------------------------------------------------------------------------------------------- |
| `version` | The MCP server version. |
| `transport` | The transport protocol. Always `http`. |
| `url` | The default public MCP server URL. |
| `servers` | Available MCP servers. Always includes a `public` entry. When authentication is enabled on your site, also includes an `authenticated` entry. |
| `servers[].name` | Identifier for the server entry. |
| `servers[].authentication` | Authentication method for the server entry. |
### Enable authenticated MCP
If your documentation requires authentication, your MCP server requires users to authenticate before connecting. When a user adds your MCP server URL to their AI tool, they must log in with their existing credentials. After authenticating, a redirect sends them back to their tool. The MCP server only returns content each user has permission to access based on their [user groups](/deploy/authentication-setup).
If your documentation has partial authentication with both public and protected pages, you have two MCP server endpoints:
* `/mcp`: Does not require authentication. Returns only public content. Share this with users who need access to public content.
* `/authed/mcp`: Always requires authentication. Returns content scoped to each user's permissions based on their [user groups](/deploy/authentication-setup). Share this with users who need access to protected content.
The `/authed/mcp` endpoint uses its own OAuth flow at `/authed/mcp/oauth/*`. Redirect domains configured for your MCP server apply to both `/mcp` and `/authed/mcp`.
By default, your MCP server is only available for localhost tools. To allow web-based tools to connect, add the redirect domains for the AI tools. A redirect domain is the hostname that an AI tool uses after a user completes authentication like `claude.ai` or `app.cursor.ai`. Your users' AI tools cannot complete authentication unless their redirect domain is on this list.
1. Navigate to the [MCP server page](https://dashboard.mintlify.com/products/mcp) in your dashboard.
2. Click the **Enable MCP Server** toggle.
Add the redirect domains for the AI tools you want to grant your users access to. Your users' AI tools cannot complete authentication unless their redirect domain is on this list. Common redirect domains include `claude.ai` and `vscode.dev/redirect`.
By default, redirect domains use `https://`. To allow a custom protocol scheme, include the full protocol in the domain entry. For example, a native app callback like `myapp://callback`. Mintlify always blocks dangerous protocols such as `javascript:`, `data:`, and `file:`.
Loopback addresses (`localhost`, `127.0.0.1`) are always trusted and do not need to be added.
### Client credentials
Client credentials let you connect to your authenticated MCP server programmatically without a browser-based login. Use client credentials for server-side integrations, CI/CD pipelines, automated workflows, and any environment where a user cannot complete an interactive OAuth flow.
Client credentials authenticate against the `/authed/mcp` endpoint and return all content from public pages and authenticated pages that aren't restricted to specific groups.
1. Navigate to the [MCP server page](https://dashboard.mintlify.com/products/mcp) in your dashboard.
2. In the **Client Credentials** section, click **Create credential**.
3. Enter a label for the credential to identify its purpose.
4. Copy the **client ID** and **client secret**. The client secret is only shown once. You cannot retrieve it later.
Send a POST request to your MCP server's token endpoint with your client ID and secret. Your token endpoint is at the `/authed/mcp/oauth/token` path of your documentation URL.
```bash cURL theme={null}
curl -X POST https://your-docs.com/authed/mcp/oauth/token \
-H 'Content-Type: application/x-www-form-urlencoded' \
-d 'grant_type=client_credentials&client_id=CLIENT_ID&client_secret=CLIENT_SECRET'
```
```bash cURL (Basic Auth) theme={null}
curl -X POST https://your-docs.com/authed/mcp/oauth/token \
-H 'Content-Type: application/x-www-form-urlencoded' \
-H 'Authorization: Basic BASE64_CLIENT_ID_COLON_SECRET' \
-d 'grant_type=client_credentials'
```
The response includes an access token and a refresh token:
```json theme={null}
{
"access_token": "eyJhbGciOi...",
"token_type": "Bearer",
"expires_in": 1209600,
"refresh_token": "eyJhbGciOi...",
"scope": "mcp:search"
}
```
Access tokens expire after the number of seconds specified in `expires_in`. Use the `refresh_token` to obtain a new access token when the current one expires.
Use the access token as a bearer token when connecting to the `/authed/mcp` endpoint.
```bash cURL theme={null}
curl -X POST https://your-docs.com/authed/mcp \
-H 'Authorization: Bearer ACCESS_TOKEN' \
-H 'Content-Type: application/json' \
-H 'Accept: application/json, text/event-stream' \
-d '{
"jsonrpc": "2.0",
"id": 1,
"method": "initialize",
"params": {
"protocolVersion": "2025-03-26",
"capabilities": {},
"clientInfo": {"name": "my-integration", "version": "1.0.0"}
}
}'
```
```bash Claude Code theme={null}
claude mcp add --transport http \
--header "Authorization: Bearer ACCESS_TOKEN" \
my-docs https://your-docs.com/authed/mcp
```
#### Managing client credentials
You can manage your client credentials from the [MCP server page](https://dashboard.mintlify.com/products/mcp) in your dashboard.
* **Delete a credential** to permanently revoke access. This cannot be undone.
Treat client secrets like passwords. Do not commit them to source control or expose them in client-side code. Use environment variables or a secrets manager to store them.
### Rate limits
To protect availability, Mintlify applies rate limits to MCP servers.
| Scope | Limit | Description |
| :------------------------------------------------------------------ | :----------------------- | :----------------------------------------------------------------------------------------------- |
| Per user (IP address) | 5,000 requests per hour | Limits how frequently a single user can query your MCP server configuration. |
| Search per documentation site (domain) | 10,000 requests per hour | Limits total search tool calls across all users of your MCP server. |
| Query docs filesystem per documentation site (domain) | 10,000 requests per hour | Limits total query docs filesystem tool calls across all users of your MCP server. |
| Authenticated search per documentation site (domain) | 5,000 requests per hour | Limits total authenticated search tool calls across all users of your MCP server. |
| Authenticated query docs filesystem per documentation site (domain) | 5,000 requests per hour | Limits total authenticated query docs filesystem tool calls across all users of your MCP server. |
## Content filtering and indexing
Your MCP server searches content that Mintlify indexes from your documentation repository. File processing and search indexing control what content is available through your MCP server.
For documentation that requires authentication, your MCP server indexes [public pages](/deploy/authentication-setup#make-pages-public) and any pages an authenticated user has permission to access based on their [user groups](/deploy/authentication-setup#restrict-pages-to-specific-user-groups).
For documentation with partial authentication, unauthenticated users can search public pages. Authenticated users can search public pages and any pages they have permission to access based on their user groups.
### File processing with `.mintignore`
If files match [.mintignore](/organize/mintignore) patterns, Mintlify does not process or index them. These files are not available through your MCP server.
### Search indexing with `docs.json`
By default, Mintlify only indexes pages included in your `docs.json` navigation for search through your MCP server.
Mintlify excludes [hidden pages](/organize/hidden-pages) (pages not in your navigation) from the search index unless you choose to index all pages. To include hidden pages in your MCP server's search results, add the `seo.indexing` property to your `docs.json`.
```json theme={null}
"seo": {
"indexing": "all"
}
```
To exclude a specific page from search indexing, add `noindex: true` to its frontmatter.
```mdx theme={null}
---
title: "Hidden page"
description: "This page is not in the navigation and is not available through search."
noindex: true
---
```
## Use your MCP server
Your users must connect your MCP server to their preferred AI tools.
1. Make your MCP server URL publicly available.
2. Users copy your MCP server URL and add it to their tools.
3. Users access your documentation through their tools.
These are some of the ways you can help your users connect to your MCP server:
Add options in the [contextual menu](/ai/contextual-menu) for your users to connect to your MCP server from any page of your documentation.
| Option | Identifier | Description |
| :--------------------------- | :--------- | :---------------------------------------------------------- |
| **Copy MCP server URL** | `mcp` | Copies your MCP server URL to the user's clipboard. |
| **Copy MCP install command** | `add-mcp` | Copies the `npx add-mcp` command to install the MCP server. |
| **Connect to Cursor** | `cursor` | Installs your MCP server in Cursor. |
| **Connect to VS Code** | `vscode` | Installs your MCP server in VS Code. |
Navigate to your [dashboard](https://dashboard.mintlify.com/products/mcp) and find your MCP server URL.
Create a guide for your users that includes your MCP server URL and the steps to connect it to Claude.
1. Navigate to the [Connectors](https://claude.ai/settings/connectors) page in the Claude settings.
2. Click **Add custom connector**.
3. Add your MCP server name and URL.
4. Click **Add**.
5. When using Claude, click the attachments button (the plus icon).
6. Select your MCP server.
See the [Model Context Protocol documentation](https://modelcontextprotocol.io/docs/tutorials/use-remote-mcp-server#connecting-to-a-remote-mcp-server) for more details.
Navigate to your [dashboard](https://dashboard.mintlify.com/products/mcp) and find your MCP server URL.
Create a guide for your users that includes your MCP server URL and the command to connect it to Claude Code.
```bash theme={null}
claude mcp add --transport http
```
See the [Claude Code documentation](https://docs.anthropic.com/en/docs/claude-code/mcp#installing-mcp-servers) for more details.
Navigate to your [dashboard](https://dashboard.mintlify.com/products/mcp) and find your MCP server URL.
Create a guide for your users that includes your MCP server URL and the steps to connect it to Cursor.
1. Use Command + Shift + P (Ctrl + Shift + P on Windows) to open the command palette.
2. Search for "Open MCP settings".
3. Click **Add custom MCP**. This opens the `mcp.json` file.
4. In `mcp.json`, configure your server:
```json theme={null}
{
"mcpServers": {
"": {
"url": ""
}
}
}
```
See the [Cursor documentation](https://docs.cursor.com/en/context/mcp#installing-mcp-servers) for more details.
Navigate to your [dashboard](https://dashboard.mintlify.com/products/mcp) and find your MCP server URL.
Create a guide for your users that includes your MCP server URL and the steps to connect it to VS Code.
1. Create a `.vscode/mcp.json` file.
2. In `mcp.json`, configure your server:
```json theme={null}
{
"servers": {
"": {
"type": "http",
"url": ""
}
}
}
```
See the [VS Code documentation](https://code.visualstudio.com/docs/copilot/chat/mcp-servers) for more details.
### Example: Connect to the Mintlify MCP server
Connect to the Mintlify MCP server to search this documentation site within your preferred AI tool. This gives you more accurate answers about how to use Mintlify in your local environment and demonstrates how you can help your users connect to your MCP server.
At the top of this page, click the contextual menu, then click **Connect to Cursor** or **Connect to VS Code** to connect the Mintlify MCP server to the IDE of your choice.
To use the Mintlify MCP server with Claude:
1. Navigate to the [Connectors](https://claude.ai/settings/connectors) page in the Claude settings.
2. Click **Add custom connector**.
3. Add the Mintlify MCP server:
* Name: `Mintlify`
* URL: `https://mintlify.com/docs/mcp`
4. Click **Add**.
1. When using Claude, click the attachments button (the plus icon).
2. Select the Mintlify MCP server.
3. Ask Claude a question about Mintlify.
See the [Model Context Protocol documentation](https://modelcontextprotocol.io/docs/tutorials/use-remote-mcp-server#connecting-to-a-remote-mcp-server) for more details.
To use the Mintlify MCP server with Claude Code, run the following command:
```bash theme={null}
claude mcp add --transport http Mintlify https://mintlify.com/docs/mcp
```
Test the connection by running:
```bash theme={null}
claude mcp list
```
See the [Claude Code documentation](https://docs.anthropic.com/en/docs/claude-code/mcp#installing-mcp-servers) for more details.
Install in Cursor
To connect the Mintlify MCP server to Cursor, click the **Install in Cursor** button. Or to manually connect the MCP server, follow these steps:
1. Use Command + Shift + P (Ctrl + Shift + P on Windows) to open the command palette.
2. Search for "Open MCP settings".
3. Click **Add custom MCP**. This opens the `mcp.json` file.
In `mcp.json`, add:
```json theme={null}
{
"mcpServers": {
"Mintlify": {
"url": "https://mintlify.com/docs/mcp"
}
}
}
```
In Cursor's chat, ask "What tools do you have available?" Cursor should show the Mintlify MCP server as an available tool.
See [Installing MCP servers](https://docs.cursor.com/en/context/mcp#installing-mcp-servers) in the Cursor documentation for more details.
Install in VS Code
To connect the Mintlify MCP server to VS Code, click the **Install in VS Code** button. Or to manually connect the MCP server, create a `.vscode/mcp.json` file and add:
```json theme={null}
{
"servers": {
"Mintlify": {
"type": "http",
"url": "https://mintlify.com/docs/mcp"
}
}
}
```
See the [VS Code documentation](https://code.visualstudio.com/docs/copilot/chat/mcp-servers) for more details.
### Using multiple MCP servers
Users can connect multiple MCP servers to their AI tools. Connected MCP servers do not consume context until the AI calls a search tool. The AI decides when to search based on query relevance, so it doesn't search every connected server for every question.
When the AI searches, each query returns multiple results that add to the conversation's context. If the AI searches several servers for a single question, this can use up significant context.
Best practices for using multiple MCP servers:
* Connect only the MCP servers relevant to your current work.
* Be specific in your prompts so the AI searches the most relevant server.
* Disconnect servers you're not actively using to reduce potential context usage.